
How to Remove Black Residue on Bottom of Pan in 2026

Black residue on the bottom of your pan usually comes from burnt food, overheated oil, or soot from a gas flame. I’ve dealt with this many times, so in this guide I’ll share simple, non-toxic ways to restore your cookware. I use common household ingredients and modern cleaning tools common in 2026 kitchens. You’ll get clear, practical steps for stainless steel, nonstick, aluminum, and cast iron pans.
How to Remove Black Residue on Bottom of Pan in 2026
I remember the first time I pulled a skillet off the stove and found a crusty black patch on the bottom. It looked hopeless. After testing lots of methods, I learned what really works. That black residue is more than an eyesore. It can change heat transfer, make pans less efficient, and, if extreme, release bad fumes. In 2026, kitchens are smarter and cleaners are greener. That makes cleanup faster and safer.
This guide shows proven, eco-friendly methods to restore cookware to near-new condition. I cover baking soda and vinegar, steam boils, modern plant-based cleaners, ultrasonic cleaning, and natural scrubs. I also explain how to prevent residue and when a pan is beyond saving. I write from experience. I test methods across pan types and report what works best for each material.
What Causes Black Residue on Pans?
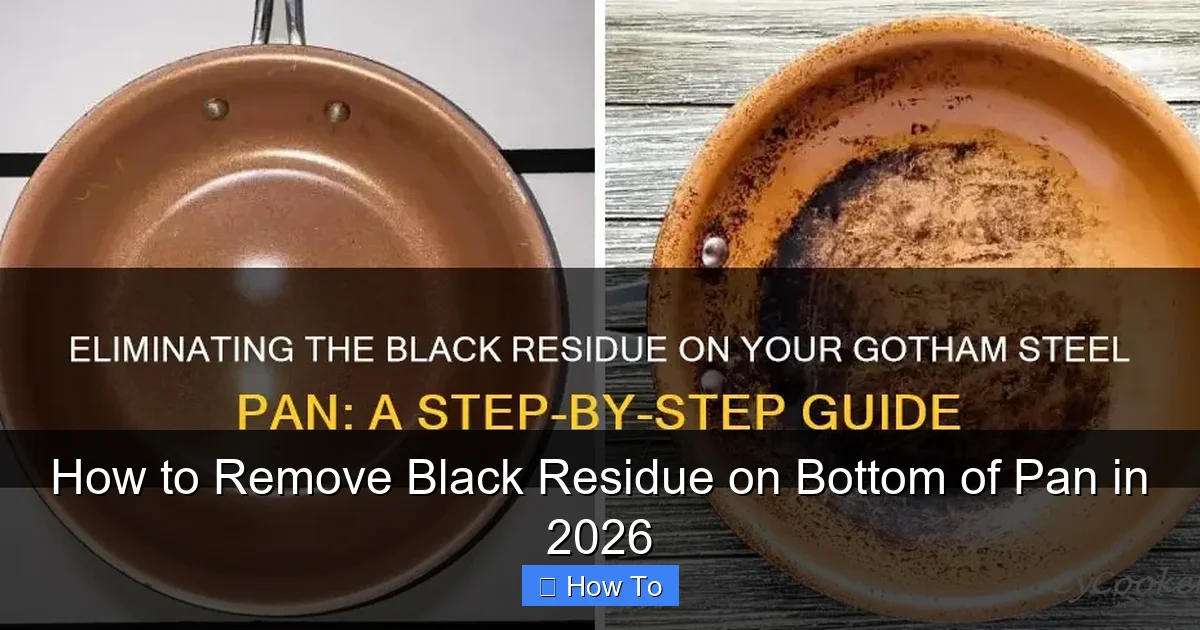
Most black residue is a mix of carbonized food, polymerized oil, and soot from gas flames or dirty burners. Here are the common causes:
- Overheating: Leaving an empty pan on high heat oxidizes the metal and locks in carbon deposits.
- Burnt oil or food: High temperatures burn oils and food. That creates a hard, black crust of carbonized material.
- Gas stove soot: Uneven flames or dirty burners produce soot that settles on the pan’s exterior.
- Improper cleaning: Letting residue sit lets it bake on and harden over time.
In 2026, many stoves include smart sensors that warn when a pan is too hot. Those sensors help reduce residue. Still, a few stubborn spots will need manual cleaning sometimes.
Method 1: Baking Soda and Vinegar (The Classic Combo)
I use this method most often. It is cheap, safe, and works on stainless steel, aluminum, and many nonstick surfaces—used carefully. The baking soda gives a mild abrasive lift. The vinegar’s acid breaks the carbon bonds.
What You’ll Need
- Baking soda
- White vinegar
- Water
- Soft sponge or nylon scrubber
- Microfiber cloth
Step-by-Step Instructions
- Cool the pan completely. Never clean a hot pan. Sudden temperature change can warp metal.
- Sprinkle baking soda generously over the blackened area. For a standard 10-inch pan I use 2–3 tablespoons.
- Add a little water to make a thick paste. Spread it to cover the residue.
- Pour white vinegar over the paste. Expect fizzing. That reaction loosens burnt-on carbon.
- Let it sit 15–30 minutes. For heavy buildup, cover with a damp cloth to keep it moist.
- Scrub gently with a soft sponge or nylon brush. Avoid steel wool on nonstick coatings.
- Rinse with warm water and dry with a microfiber cloth.
Pro Tip: Add a drop or two of liquid dish soap to the paste. The surfactant helps lift grease and soot. If stubborn spots remain, repeat the process. This method is non-toxic and safe for most cookware types.
Method 2: Boiling Water and Vinegar
When residue is baked-on and tough, steam loosens it. I use this on cast iron and thick stainless pans. It can also help with encrusted aluminum cookware. The heat and acid break down carbon and mineral layers.
What You’ll Need
- Water
- White vinegar or lemon juice
- Stovetop or electric kettle
- Scrubbing brush or sponge
Step-by-Step Instructions
- Fill the pan with water until the black area is covered.
- Add 1 cup vinegar or lemon juice. The acid helps dissolve carbon and mineral deposits.
- Bring to a boil and simmer 10–15 minutes. Steam and heat will loosen residue.
- Turn off heat and cool slightly. Don’t dump boiling liquid immediately.
- Use a scrub brush to remove the softened gunk. It should lift with minimal force.
- Rinse and dry thoroughly. For cast iron, apply a thin oil coat after drying to prevent rust.
Note: Avoid this on nonstick pans with damaged coatings. Boiling liquid can seep under a failing coating and make peeling worse.
Method 3: Commercial Cleaners (2026 Eco-Friendly Options)
By 2026, many people prefer plant-based, biodegradable cleaners. They cut grease without heavy chemicals. Brands like EcoScrub, GreenGlow, and PurePan make cookware-safe residue removers. I test labels and choose cleaners with clear material compatibility.
How to Use Them Safely
- Read the label to confirm the cleaner is safe for your pan material.
- Apply to the cooled pan and let sit for the recommended time (usually 5–10 minutes).
- Scrub with a non-abrasive pad, then rinse well.
- Look for certifications like “EPA Safer Choice” or “Cradle to Cradle.” These show lower environmental impact.
Bonus: Newer cleaners come in dissolvable pods or spray bottles with built-in scrubbing fibers. These reduce mess and waste. I keep one eco-friendly paste for quick touch-ups and a pod pack for deeper cleans.
Method 4: Ultrasonic Cleaning (The Future Is Here)
Compact ultrasonic cleaners are becoming common in home kitchens. I use one for stainless steel and aluminum pans. They use sound waves to make tiny cavitation bubbles. Those bubbles burst and remove residue without scrubbing.
How It Works
- Fill the ultrasonic cleaner with water and a few drops of mild detergent.
- Place the pan (or just the bottom) in the tank.
- Run the cleaner 5–10 minutes.
- Remove the pan and wipe away any remaining residue with a soft cloth.
Best For: Stainless steel and aluminum. Not recommended for nonstick or seasoned cast iron.
Cost: Entry-level models start around $50. Some modern kitchens now include built-in cleaning drawers or dedicated ultrasonic stations. Ultrasonic cleaning removes microscopic grime and can be gentler than abrasive scrubbing.
Method 5: DIY Scrub with Salt and Lemon
When I want a fast, natural scrub, I reach for coarse salt and lemon. It’s cheap and smells great. The salt provides light abrasion. Lemon adds citric acid to dissolve carbon and bad odors.
Instructions
- Cut a lemon in half and dip it in coarse sea salt or kosher salt.
- Rub the lemon over the black residue with firm, circular motions.
- Let sit 5 minutes, then rinse with warm water.
- Repeat if needed.
Why It Works: The lemon’s acid softens grime. The salt scrubs it away without scratching most surfaces. It also leaves a fresh scent and is fully natural.
Troubleshooting Common Issues
Residue Won’t Budge?
Sometimes residue resists one treatment. It may be polymerized fats or deeply carbonized oil. Try the baking soda-and-vinegar method again. If that fails, use a plastic scraper to lift the top layer. Then reapply the paste. For stainless steel, a commercial stainless cleaner or Bar Keepers Friend-style product (follow label directions) can help remove stains and rainbow discoloration.
Pan Is Discolored or Scratched?
Avoid steel wool or harsh abrasives on nonstick or anodized aluminum. Use nylon brushes or microfiber pads instead. For stainless steel, mild polishes restore shine. If surface scratches are deep, the pan may lose efficient heat transfer and you should consider replacement.
Smell Lingers After Cleaning?
Burned-on residue can trap smells. Soak the pan overnight in water mixed with baking soda. Rinse well the next day. You can also boil water with a few lemon slices to lift lingering odors. For stubborn smells, repeat the soak or use an enzyme-based cleaner designed for kitchen odors.
Is My Pan Still Safe to Use?
If a pan is warped, has deep scratches, or the nonstick coating is peeling, toss it. A damaged pan can release particles and toxic fumes when heated. In 2026, many brands offer trade-in programs that recycle old cookware into new products. Check the manufacturer’s recycling and trade-in options before discarding.
How to Prevent Black Residue in the Future
Prevention saves time and keeps pans working better. I follow a few habits that cut residue buildup dramatically.
- Cook on medium heat. High heat is the #1 cause of residue. Use a thermometer or smart pan with heat alerts.
- Don’t leave an empty pan on the stove. Even a few minutes can scorch the surface.
- Clean pans while still warm (not hot). Residue wipes away easier before it hardens.
- Pick the right oil. Oils with low smoke points (like flaxseed) burn fast. Use avocado, refined olive oil, or high-smoke-point blends for searing.
- Maintain your stove. Clean gas burners to avoid soot. Wipe electric and induction tops after use to prevent baked-on grease.
- Invest in quality cookware. Newer pans feature nano-ceramic coatings, copper cores, or multi-layer stainless that distribute heat evenly and resist sticking.
Quick Kitchen Tools Checklist (2026)
- Nylon scrub pads and silicone scrapers
- Microfiber cloths and cotton towels
- Baking soda, white vinegar, and dish soap
- Compact ultrasonic cleaner (if you own stainless or aluminum pans)
- Eco-friendly commercial cleaner for tough jobs
- Small plastic scraper for stubborn, burnt-on layers
Conclusion
Removing black residue from the bottom of your pan doesn’t have to be hard. I use simple, non-toxic methods like baking soda and vinegar, boiling vinegar steam, ultrasonic cleaning, or salt and lemon. For very tough jobs I turn to eco-friendly commercial cleaners or a compact ultrasonic unit. The key is to act quickly and use the right method for your pan type.
Follow these routines and you’ll extend the life of your cookware. You’ll also keep cooking safer and more efficient. With today’s greener cleaning products and smart kitchen tech, keeping pans clean is easier than ever.
Next time you find that stubborn black layer, don’t worry. Grab baking soda, heat some water, or run an ultrasonic cycle. With the right method, you’ll get your pan back to working and looking great.
Additional Resources and References
For more details on cookware care, look for manufacturer guides for your pan model. Also check labels and certifications (EPA Safer Choice, Cradle to Cradle) when buying cleaners. If your stove has smart features, consult the stove manual to learn about overheating alerts and safe operation. These small steps improve longevity and reduce residue over time.




One Comment