How To Clean Old Cast Iron Cookware: Easy Restoration Guide

Use salt scrubs, hot water, steel wool for rust, then reseason with oil in an oven.
I’ve restored, cooked with, and cared for vintage cast iron for years—from flea market rescues to heirloom skillets. In this guide on How to Clean Old Cast Iron Cookware, I share safe steps, tools, and proven tricks that actually work at home. You’ll learn simple routines for light grime, deeper methods for rust and heavy buildup, and how to reseason so your pan cooks like new. I’ll also cover common mistakes to avoid, how to spot pans worth saving, and what to do after the first cook.

Why clean and restore old cast iron cookware?
Cast iron can last for generations. It also collects old grease, rust, and brittle seasoning that can ruin flavor. Learning How to Clean Old Cast Iron Cookware saves money and lets you reclaim pieces with real character.
When restored, cast iron offers excellent heat retention, searing power, and a naturally nonstick, polymerized oil surface. There are limits, though. Very thin, cracked, or badly warped pans may not be worth the effort. My first restoration was a wreck from a flea market. After a few hours of careful work, it became a kitchen workhorse that still sees daily use.

Safety and tools you need
Use safe, simple methods. Work with good ventilation. Wear gloves and eye protection whenever you use strong cleaners, power tools, or high heat.
Essential tools and supplies:
- Steel wool or coarse scrub pads for rust and baked-on food
- Coarse kosher salt for gentle scrubbing
- Stiff nylon brush
- Mild dish soap for light cleaning
- Vinegar for short rust soaking (diluted)
- Baking soda to neutralize vinegar
- High smoke-point oil for seasoning, like flaxseed, grapeseed, or canola
- Oven or hotplate for reseasoning
- Wire brush, drill-mounted brush, or orbital sander for heavy pitting (optional)
- Protective gloves and goggles
I carry these tools in a small kit for every restoration. Simple, durable tools are enough for most jobs, even on old skillets, Dutch ovens, and griddles.
- Extra safety tips I use:
- Never mix vinegar with bleach. That creates toxic gas.
- If you use lye, wear full PPE and keep kids and pets away.
- Power tools throw dust. Use a mask and eye protection.
- Ventilate well during high-heat burn-offs. Fumes are strong.
How to evaluate a pan before you start (save time and effort)
Not sure if a pan is worth restoring? Here’s how I check it fast:
- Cracks: Tap the rim with a metal spoon. A clear ring usually means no cracks; a dull clunk can signal a fracture.
- Warping: Set the pan on a flat surface. If it rocks, it may not sit flat on a stove.
- Thickness: Heavy, even walls are a good sign. Very thin spots can overheat or break.
- Brand marks: Names like Lodge, Griswold, or Wagner Ware can indicate quality but aren’t required for great results.
- Rust vs. gunk: Orange rust is removable. Thick black crust can mean more work but is still fixable.
If a pan is cracked or severely warped, I skip it. Almost everything else is fair game.

Step-by-step: Basic cleaning for lightly neglected pans
This method works when your pan has food build-up but little rust. It’s fast, gentle, and great for a routine clean.
- Rinse pan with hot water.
- Sprinkle coarse kosher salt inside the pan.
- Scrub with a damp cloth or stiff brush until residue loosens.
- Rinse with hot water and dry thoroughly over low heat on the stove.
- Rub a thin coat of oil over the whole pan while warm.
- Heat it on the stove for a few minutes or place in a 350°F oven for an hour to set the oil.
This simple routine handles most kitchen grime. Repeat oiling if the pan looks dull.
Pro tips for quick cleans
- Stuck bits? Simmer a little water for 2–3 minutes, then scrape with a wooden spatula.
- Salt + a cut potato makes a great natural scouring pad for light rust or sticky spots.
- Avoid the dishwasher. It strips seasoning and causes flash rust.
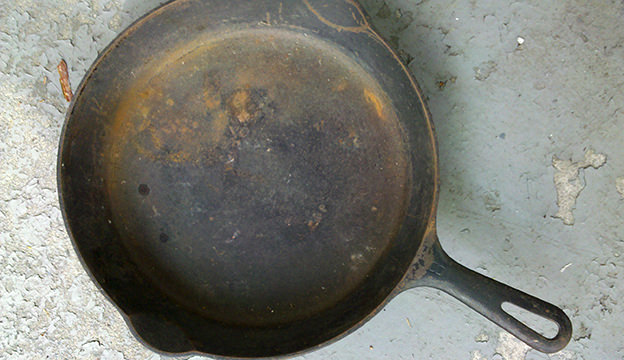
Step-by-step: Deep cleaning for very old or rusty pans
For pans with heavy rust, old factory coatings, or thick grime, use a deeper process. How to Clean Old Cast Iron Cookware properly here often means stripping then reseasoning.
- Remove loose rust and debris with a wire brush or steel wool.
- Soak the pan for short periods in a 1:1 vinegar and water solution if rust is stubborn. Check every 30 minutes and don’t exceed a few hours to avoid metal pitting.
- Rinse and neutralize with a baking soda paste, then scrub again with steel wool.
- If rust persists, use a drill brush or sand until bare metal shows.
- Wash with warm, soapy water and dry completely.
- Oven-bake the pan at 400–450°F for an hour after coating lightly with oil. Repeat oiling and baking 2–3 times for a good base layer.
Note on timing: vinegar will eat iron if left too long. I once left a pan overnight and had to sand more metal away. Check often.
Deep-cleaning notes from the shop
- Flash rust happens fast after vinegar. Dry with heat (200°F oven for 10 minutes) and oil right away.
- If the surface looks gray and clean, you’re ready to season. If it’s still orange or rough, keep going.
- Don’t chase every tiny pit. A few small pores won’t affect cooking.

Removing extreme buildup: mechanical and chemical options
Some pans need stronger solutions. Choose based on what you can safely do at home.
Common methods:
- Baking soda paste: Good for mild stains. Scrub and rinse.
- Oven self-cleaning or high-heat burn-off: Works on old nonstick coatings. Use caution and ventilate.
- Electrolysis: Uses a battery charger to remove rust without harsh acids. Effective but needs setup and safety care.
- Lye or potassium hydroxide dips: Powerful for stripping, often used professionally. Use full PPE and follow instructions.
- Sandblasting or media blasting: Fast and effective at removing old finish. Best done by pros for control.
Limitations:
- Chemical dips can weaken metal if misused.
- Sandblasting removes years of pitting along with rust, which can thin the pan.
- Electrolysis is slower but preserves metal well.
I prefer gentle mechanical removal first, then electrolysis for pitted heirlooms. If you choose chemicals, respect safety rules.
Quick how-tos for advanced methods
- Electrolysis basics: Plastic tub, washing soda electrolyte, sacrificial steel, and a 12V charger. Keep anode and pan apart. Run outside. Rinse, scrub, and dry after.
- Lye bath notes: Use a plastic bin and a measured lye solution. Submerge until the old seasoning softens. Neutralize with diluted vinegar, rinse, then dry with heat.
- Oven self-clean: Put the pan upside down. Expect smoke and residue. Let the oven cool fully before opening, then scrub and season.
:max_bytes(150000):strip_icc()/__opt__aboutcom__coeus__resources__content_migration__serious_eats__seriouseats.com__images__2014__11__20141121-cast-iron-pan-restoration-daniel-gritzer-edit-22-c2b8d38877ff402382a56ac7b63a311b.jpg)
Reseasoning: building a strong nonstick surface
Reseasoning bonds oil to iron to make a nonstick layer. How to Clean Old Cast Iron Cookware properly always ends with good seasoning.
Oven method (reliable):
- Preheat oven to 450°F.
- Wipe pan with a thin coat of oil inside and out. Remove pools so the layer is thin.
- Place upside down on the middle rack with foil below to catch drips.
- Bake 1 hour. Turn off oven and let the pan cool inside.
Repeat 2–4 times for a good foundation.
Stovetop quick-season:
- Heat the pan until smoking lightly, then rub with oil and let cool. Repeat several times.
Oil choices:
- Flaxseed oil gives a hard, glossy surface but can flake if applied too thick.
- Grapeseed and canola are forgiving and work well for most cooks.
I usually do three oven coats. The surface becomes dark and smooth after a few uses.
Seasoning science in plain language
- Seasoning is polymerized oil. Heat transforms a thin oil film into a hard, slick layer.
- Too much oil stays gummy. The right amount looks almost dry before baking.
- Higher heat (400–500°F) builds a tougher layer, but you must wipe oil very thin.
First cooks after seasoning
- Start with fatty foods: bacon, sausage, or fried potatoes. They reinforce the coating.
- Avoid long, acidic cooks (tomato sauces, wine braises) for the first 5–10 uses.
- If you see slight sticking, don’t panic. Keep cooking and keep oiling lightly after cleaning.
Common seasoning mistakes to avoid
- Over-oiling: If it looks wet, it’s too much. Wipe until the surface looks matte.
- Low heat: Oil won’t polymerize well below 400°F in the oven.
- Rushing cool-down: Let the pan cool in the oven to prevent condensation and streaks.

Daily care and long-term maintenance
Good routines keep the hard work from coming undone.
After each use:
- Wipe with a paper towel while warm.
- Rinse with hot water and scrub with a little salt for stuck bits.
- Dry immediately on the stove over low heat.
- Apply a thin coat of oil before storage.
Long-term tips:
- Avoid soaking in water for long periods.
- Re-season lightly after 10–20 uses or when food sticks.
- Store in a dry place. Use a paper towel inside stacked pans to absorb moisture.
I re-oil pans in winter more often because humidity makes rust return faster.
Extra care for humid homes and camping
- Slip a silica gel packet or dry paper towel into the pan before storing.
- For camping, wipe clean, heat-dry, and oil while still warm. Wrap in a cloth.
- If light orange rust appears, scrub with salt, dry hot, and re-oil. Don’t wait.
Troubleshooting common issues
Sticky or gummy surface
- This usually comes from too much oil or low temp during seasoning. Scrub, wipe off excess, and rebake at 450°F.
Flaking seasoning
- Flakes mean the layer didn’t bond. Strip to bare metal as needed and redo thin coats.
Rust returns quickly
- Dry fully and oil after each use. If rust is deep, repeat rust removal and reseasoning.
Hot spots or uneven seasoning
- Use regular cooking of fatty foods and repeat short seasoning cycles. Patience works.
More quick fixes from real kitchens
- Black residue on a paper towel: Normal carbon. Keep cooking and oiling thinly.
- Metallic taste: Usually under-seasoned. Add one more thin oven coat at 450°F.
- Smells rancid: Wash with hot, soapy water, dry hot, wipe with fresh oil, and heat to smoke for a few minutes.

Frequently Asked Questions
Will soap ruin my cast iron?
Mild soap used occasionally will not ruin a well-seasoned pan. Use soap only for greasy residue and re-oil the pan after drying.
Can I use the oven self-clean cycle to strip a pan?
Yes, the oven self-clean cycle can burn off old coatings, but it may warp thin pans and produce strong fumes. Use this method only for heavy-duty pieces and ventilate well.
How often should I reseason cast iron?
Reseason when food starts to stick or the surface looks dull. Light re-oiling after each use prevents the need for full reseasoning often.
Is it safe to use vinegar to remove rust?
Yes, vinegar is effective but must be used with care. Limit soak times and rinse and neutralize with baking soda to avoid metal damage.
Can I restore a pan with heavy pitting?
You can restore pitted pans, but pitting reduces metal thickness and heat performance. If the pan is structurally sound, you can still clean and season it for use.
How to remove stuck-on baked grease?
Use coarse salt and hot water as an abrasive scrub. For tough spots, simmer water in the pan for a few minutes, then scrape gently.
Can I cook tomatoes or acidic foods in cast iron?
Yes, once the seasoning is well established. For new seasoning, avoid long acidic cooks for the first 5–10 uses.
Should I heat the pan dry before adding oil?
For everyday cooking, preheat the pan first. Add oil to a warm surface for better nonstick performance.
Is vintage cast iron better than new?
Many older pans were machined smoother, which some cooks prefer. New pans (like Lodge) are thicker and durable. Either can perform great with proper seasoning.
Conclusion
Cleaning and restoring cast iron is practical work with big rewards. Follow safe steps: remove rust, clean fully, and build seasoning with thin oil layers baked on. With simple tools and care, you can make old pans cook like new and keep them for decades. Try one pan this weekend, share your result, and subscribe or comment to learn more tips and tricks.