How to Season Cast Iron With Oven for Lasting Nonstick Results

Seasoning a cast iron skillet is like giving it new life. I say that from experience. It’s not just a quick clean. It’s routine care that makes your cookware stronger, easier to use, and more rust resistant. When you season in an oven, you get an even coating and a tougher finish that lasts.
A lot of home cooks are nervous about seasoning cast iron. They think it’s complicated or easy to mess up. I used to feel that way too. Once you learn the simple steps, it’s quick and very satisfying. This guide walks you through exactly how to season cast iron with an oven. I share clear steps, practical tips, and a few extras I picked up over the years that most beginner guides miss.
Why Seasoning Cast Iron Matters
Seasoning does more than make your skillet look shiny. It builds a functional nonstick surface. Raw cast iron is rough and porous. Each layer of seasoning fills those tiny pores with polymerized oil. The result is a hard, smooth surface that makes cooking easier, protects against rust, and improves flavor.
Seasoning works on more than skillets. It helps Dutch ovens, griddles, baking pans, and cast iron woks. Every bare cast iron piece benefits from seasoning—even if it looks smooth when new.
A well-seasoned pan can last generations. I’ve used pans that get better with age. With regular use and care, a cast iron pan can be handed down for decades.
Good seasoning also adds flavor. Over time the surface absorbs tiny traces of fats and past meals. That builds a subtle richness you don’t get from nonstick or stainless steel—great for searing meat, roasting vegetables, or baking cornbread.
Don’t worry if you scratch or burn the pan. Cast iron is forgiving. You can always reseason and restore it. That’s one reason chefs and home cooks love cast iron—it’s almost impossible to ruin forever.
Quick note on the science
When we talk about seasoning, we mean a chemical process called polymerization. Heat transforms the oil into a hard, plastic-like layer that bonds to the iron. High oven heat and thin coats help this happen evenly.
What You Need To Season Cast Iron In The Oven
Before you start, gather these items:
- Cast iron cookware (skillet, Dutch oven, etc.)
- Cooking oil with a high smoke point (see comparison table below)
- Paper towels or clean cloth
- Mild dish soap
- Nylon brush or sponge
- Aluminum foil (to catch oil drips)
- Oven mitts
Choosing the right oil is the first step. Some oils work better for seasoning than others. Look for neutral oils with high smoke points so they polymerize cleanly without burning.
| Oil | Smoke Point (°F) | Flavor | Seasoning Quality |
|---|---|---|---|
| Flaxseed oil | 225 | Nutty | Excellent, hard finish |
| Grapeseed oil | 420 | Neutral | Very good |
| Canola oil | 400 | Neutral | Good |
| Vegetable oil | 400 | Neutral | Good |
| Olive oil | 375 | Fruity | Decent, not ideal |
For most of my seasoning sessions I use canola or grapeseed oil. They are cheap, easy to find, and reliable. Flaxseed oil can make the hardest, most glass-like finish, but it’s pricier and needs careful handling because of its low smoke point and tendency to polymerize differently.
Use fresh oil. Rancid oil can smell or leave off-flavors. Store seasoning oil in a cool, dark place and check the expiration date before you start.
You can also use avocado or sunflower oil if their smoke point is above 400°F (204°C). Avoid butter, margarine, or coconut oil. They don’t bond well and can leave residue.
How To Clean Cast Iron Before Seasoning
Cleaning is important, and many skip it. If the pan is new, wash it with mild soap and water. If it’s old or rusty, scrub harder to remove loose bits and flaking old seasoning.
- Rinse the pan with warm water.
- Add a small amount of mild dish soap.
- Scrub with a nylon brush or sponge. Avoid steel wool unless you have heavy rust.
- Rinse thoroughly.
- Dry completely with paper towels. Any water left on the pan can cause rust.
For stubborn rust or flaky seasoning, use a cast iron restoration kit. These kits include scrubbing pads made for cast iron. The Lodge Rust Eraser is a tool I’ve used and recommend for tough spots.
If the pan has thick rust, try a 1:1 vinegar and water soak for 1–2 hours. This loosens rust but can strip seasoning, so only use it when needed. After soaking, scrub and rinse well.
Drying is critical. Even a single drop of water can cause oven-rust. To be safe, place the pan in the oven at 200°F (93°C) for 5–10 minutes before oiling. This removes hidden moisture, especially in humid climates.
Step-by-step Guide: Seasoning Cast Iron With Oven
Follow these steps for consistent oven seasoning:
- Preheat the oven to 450°F (232°C). This is hot enough to polymerize oil without burning it.
- Place aluminum foil on the bottom rack to catch drips.
- Dry your cookware completely. Even a little moisture can make the coating patchy.
- Pour a small amount of oil (about 1 tablespoon) onto the pan.
- Use a paper towel to spread the oil over all surfaces—inside, outside, and handle. Don’t forget the bottom!
- Wipe away excess oil. The pan should look barely wet, not dripping. Too much oil leads to sticky spots.
- Place the pan upside down on the middle rack. This prevents pooling inside the pan.
- Bake for 1 hour.
- Turn off the oven and let the pan cool inside. Slow cooling helps the seasoning bond.
For a thicker, more durable layer, repeat steps 4–9 up to three times. Each thin layer adds strength and improves the nonstick surface.
Pay special attention to corners, pouring spouts, and the handle joint. These areas trap oil and often become sticky if not wiped clean. Use a lint-free cloth to remove excess.
If your oven has a convection mode, use it. The circulation helps the oil polymerize evenly and speeds cooling. A standard oven works well too—just be patient.
For new pans I aim for three thin coats. For maintenance, one coat is usually enough. Let the pan cool fully in the oven to avoid thermal shock and to let the polymerized oil set.

Credit: jesspryles.com
Best oven temperature options
450°F (232°C) is my go-to. If you’re using flaxseed oil, some people use lower temps because of the oil’s low smoke point, but that can produce a different finish. Stick with 400–500°F for neutral oils like grapeseed or canola.
Common Mistakes When Seasoning Cast Iron
Mistakes can make seasoning sticky, uneven, or rusty. Watch for these:
- Using too much oil: The biggest error. Thick oil leaves sticky, gummy spots.
- Not drying the pan: Any water left behind causes rust and poor seasoning.
- Low oven temperature: If it’s not hot enough, oil won’t bond.
- Not spreading oil evenly: Patchy application gives uneven seasoning.
- Using the wrong oil: Low smoke point oils burn and smell bad.
A common beginner tip is to use butter. Don’t. Butter burns quickly and leaves a soft, unstable layer. Stick to the oils recommended above.
Rushing the process is another problem. Pulling a pan out before it cools may cause flaking or uneven layers. Let the pan cool slowly in the oven.
Stovetop seasoning can work for quick touch-ups, but it often creates hot spots and uneven results. The oven method is more reliable for full coverage.
If your oven fills with smoke, you likely used too much oil. Open a window and let it clear. Wipe the pan clean and try again with a thinner layer.
How Often Should You Season Cast Iron?
How often depends on use. For a brand-new pan, season three times before regular use. For ongoing care:
- Heavy use: Season monthly.
- Light use: Season every 2–3 months.
- After cooking acidic foods: Season again. Acid can strip the layer.
Many pans are “pre-seasoned.” That’s a good start, but a few oven seasons at home will strengthen the finish.
If the pan looks dull or food starts to stick, it needs seasoning. You don’t have to wait for major wear. Small, regular seasons keep the surface glossy and easy to cook on.
Cooking itself builds seasoning. Fatty foods—bacon, fried potatoes—deposit tiny layers of oil each time you cook. That’s why frying bacon in a new pan is a classic tip: it helps the seasoning form quickly.
If you live in a humid area, check your pans often. Quick maintenance seasoning prevents small rust spots from becoming a big problem.
Credit: www.youtube.com
How To Tell If Your Cast Iron Is Properly Seasoned
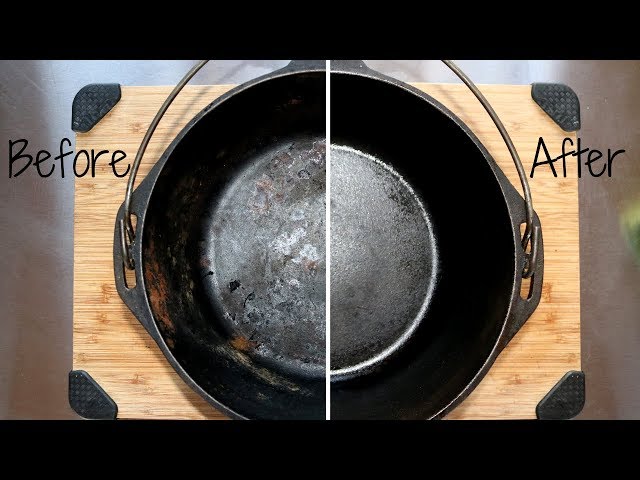
A properly seasoned pan is deep black and glossy. The surface is smooth. Food slides off. Eggs don’t cling. Water beads on the surface rather than soaking in.
If the pan looks dull, gray, or sticky, it needs more seasoning. That’s easy to fix: repeat the oven process.
Here’s a simple comparison of seasoned vs. unseasoned cast iron:
| Feature | Seasoned Cast Iron | Unseasoned Cast Iron |
|---|---|---|
| Color | Black, shiny | Gray, dull |
| Texture | Smooth, slick | Rough, porous |
| Nonstick | Excellent | Poor |
| Rust resistance | High | Low |
| Flavor | Rich, natural | Bland, metallic |
Try the simple egg test. Heat the pan with a little oil and fry an egg. If it slides easily, the seasoning is strong. If it sticks badly, add another layer.
Another test: sprinkle water on the pan. On a well-seasoned surface, drops bead and dance. On raw cast iron, the water spreads and soaks in.
Extra Tips For A Perfect Seasoned Cast Iron
These are small habits that make a big difference:
- Let the pan cool slowly: Sudden cooling can crack or peel seasoning.
- Use a lint-free cloth: Paper towels can leave fibers. A clean cotton cloth spreads oil smoothly.
- Avoid acidic foods at first: Tomato sauce, vinegar, and lemon can weaken new seasoning.
- Cook fatty foods: Bacon, sausages, and fried chicken build the layer faster.
- Store dry: Moist air damages seasoning. Keep pans in a dry place.
In humid kitchens, I keep a paper towel inside the pan to absorb moisture. When stacking pans, put a folded paper towel or parchment between them to stop scratches. For long storage, rub a tiny bit of oil on the surface first.
Reseason often if you see dull spots or small rust. Seasoning is a cycle. Each round improves the pan’s look and performance.
One habit I use: after each wash I rub a thin layer of oil on the hot pan and heat it briefly on the stove. That simple step keeps the nonstick layer strong with almost no extra work.
What To Do If Your Cast Iron Has Sticky Spots
Sticky spots happen when too much oil was used or the layer didn’t bake fully. Fix them like this:
- Scrub the sticky area with a nylon brush and hot water.
- Dry fully.
- Wipe a thin layer of oil.
- Bake for another hour.
Repeat until the stickiness is gone. If a large area stays sticky, strip the seasoning with soap and a scrub, dry, and re-season from scratch. Avoid harsh chemicals or oven cleaner. Simple soap, water, and elbow grease usually do the job.
Can You Season Cast Iron With Other Methods?
Yes. Oven seasoning is the most reliable for even coverage. Stovetop seasoning works for small touch-ups. Outdoor grills or campfires can handle big Dutch ovens but require attention to avoid burning oil.
Stovetop seasoning is handy for a quick fix. Heat the pan, rub with oil, and let it smoke for a few minutes. For full, even seasoning the oven method is better.
If you use a charcoal grill or campfire, watch the heat. Uneven flames can scorch oil and leave blotchy layers.
Choosing The Best Cast Iron For Seasoning
Not all cast iron is the same. Surface texture affects how easily seasoning builds. Here’s a quick brand comparison:
| Brand | Surface Texture | Ease of Seasoning | Price Range |
|---|---|---|---|
| Lodge | Medium rough | Easy | $20-$60 |
| Le Creuset | Smooth, enamel | Not needed (enamel) | $100-$300 |
| Victoria | Smoother | Easy | $25-$50 |
| Smithey | Polished | Very easy | $150-$200 |
Lodge skillets are affordable and great for most cooks. They are easy to find—search “Lodge Cast Iron Skillet” online. Vintage pans (Griswold, Wagner) often have very smooth surfaces and are prized for their natural nonstick quality. They’re worth restoring if you find one at a garage sale.
Enameled cast iron (like Le Creuset) does not need seasoning. The enamel layer prevents rust and gives a nonstick-like surface, but it reacts differently with high heat compared to bare seasoned iron.
Maintaining Your Cast Iron After Seasoning
Simple habits keep seasoning strong:
- Avoid soaking: Long contact with water weakens seasoning.
- Clean with hot water: Skip soap unless grease is heavy.
- Dry immediately: Prevents rust.
- Apply a thin oil layer after cleaning: Keeps the seasoning fresh.
- Store in a dry, cool place.
If you spot rust, scrub it off and reapply the oven seasoning steps.
Never use the dishwasher or leave the pan sitting in water. After cooking, wipe out food bits with a paper towel, rinse with hot water, and dry on a warm burner. This keeps the seasoning healthy and ready for the next meal.
To remove metallic smells or tiny stuck bits, rub the pan with a cut potato or coarse salt after cleaning. This neutralizes odors and polishes the surface.
Remember: cast iron improves with use. The more you cook, the better the seasoning becomes.
:max_bytes(150000):strip_icc()/__opt__aboutcom__coeus__resources__content_migration__serious_eats__seriouseats.com__images__2016__09__20160817-cast-iron-pan-vicky-wasik-10-1500x1125-eff41c54f43940998cf831760a9e6452.jpg)
Credit: www.seriouseats.com
Cooking With A Newly Seasoned Cast Iron
After oven seasoning, start with easy, fatty recipes. Cook bacon, pancakes, or fried potatoes. These foods lay down extra fat and speed seasoning.
Avoid very acidic or sticky foods for the first few uses. Tomato sauce and vinegar-based dishes can weaken new seasoning. As the surface gets stronger, you can add them back to your rotation.
Use the pan for shallow frying, searing steaks, or roasting vegetables. These methods deepen seasoning and improve flavor. With time, you can bake cornbread, pizza, or roast whole chickens in the pan.
If something sticks, don’t panic. Clean, dry, and apply a thin coat of oil after use. The surface will get slicker over weeks of regular cooking.
Safety Precautions When Seasoning Cast Iron In The Oven
Seasoning is safe when you follow a few precautions:
- Ventilate the kitchen: High heat can create smoke.
- Use oven mitts: Cast iron gets extremely hot.
- Keep children away: Hot pans and oil can cause burns.
- Check for oil drips: Aluminum foil prevents oven mess.
Never leave the oven unattended during seasoning.
If you have a smoke alarm near the kitchen, open a window or turn on a fan. Small amounts of smoke can escape as the oil polymerizes. If you see heavy smoke, check your oil amount or oven temperature.
Always lift the pan with both hands and use thick oven mitts. Cast iron is heavy and can cause serious injury if dropped.
How To Restore Old Or Rusty Cast Iron
Found a rusty pan? Don’t toss it. I’ve restored many, and here’s how:
- Scrub off rust with a nylon brush or Lodge Rust Eraser.
- Wash with soap and water.
- Dry fully.
- Follow the oven seasoning steps above.
Often, old pans come back better than new ones.
For severe rust, a short soak in white vinegar and water helps. Don’t soak too long—vinegar can eat metal. Rinse, dry, and season immediately.
If the pan has paint or another coating, remove it completely before cooking. Old paint or chemicals can be unsafe on cookware.
Restoring cast iron is rewarding. Many of my favorite pans started as thrift-store finds that I brought back to life.
Non-obvious Insights For Better Seasoning
Here are a few professional tips most guides skip:
- Preheat the pan before oiling: Warm iron absorbs oil better. Heat it in the oven for 10 minutes, then apply oil.
- Use unsaturated oils: Flaxseed, grapeseed, and canola form harder, longer-lasting layers. Saturated fats (like lard) tend to produce softer seasoning.
- Season multiple pans at once: If you have several pieces, season together to save time and energy.
Use a small, clean paintbrush to reach tight corners and spout edges. This prevents puddling and sticky buildup. For an ultra-smooth finish, lightly sand with fine sandpaper before first seasoning—this step is optional but helpful if you cook lots of eggs.
Recommended Amazon Products For Cast Iron Seasoning
These tools and oils make seasoning easier:
- Lodge Cast Iron Skillet: A classic, reliable pan for beginners and pros.
- Lodge Rust Eraser: Removes stubborn rust and old seasoning.
- Grapeseed Oil: High smoke point, perfect for seasoning.
- Chainmail Scrubber: Cleans cast iron without damaging seasoning.
Search “Lodge Cast Iron Skillet” or “Chainmail Scrubber” on Amazon to find these well-reviewed items. Also consider silicone handle covers and a good oven thermometer to ensure accurate temperatures.
FAQs (How to Season Cast Iron With Oven)
How Long Does It Take To Season Cast Iron In The Oven?
Each seasoning layer takes about 1 hour in the oven. If you add three thin layers for a new pan, allow 3–4 hours including cooling. Many people do one layer per day when building a fresh finish.
What Is The Best Oil For Oven Seasoning?
Flaxseed oil can give a very hard finish. Practically, grapeseed and canola oil are easier to find and nearly as effective. Avoid low smoke point oils like butter or extra virgin olive oil when oven seasoning.
Can You Use Soap On Seasoned Cast Iron?
Yes, occasionally. Use mild soap and rinse well. Soap removes oils so don’t use it for every clean. Most of the time hot water and a brush are enough.
How Do You Fix Sticky Or Uneven Seasoning?
Scrub the sticky area, dry the pan, apply a very thin oil layer, and bake again. Repeat until smooth. For widespread stickiness, strip and re-season from scratch.
Is Oven Seasoning Safe For All Types Of Cast Iron?
Yes—except for enameled cast iron like Le Creuset, which does not need seasoning. Plain cast iron skillets, griddles, and Dutch ovens are all suitable for oven seasoning.
If you want deeper background on the history and chemistry of cast iron seasoning, see Wikipedia’s cast iron cookware page.
Seasoning cast iron with an oven is a useful, practical skill. It’s simple, safe, and gives you durable nonstick cookware. With the right oil, proper cleaning, and careful baking, your cast iron will serve you for years and even generations.
The more you cook, the better the seasoning gets. Don’t be afraid to experiment a little. Enjoy the process—your kitchen and future meals will thank you.