How To Refurbish Cast Iron Cookware: Easy Expert Steps

You can refurbish cast iron cookware by stripping rust, cleaning it well, then re-seasoning it.
Cast iron has a way of lasting for generations, but it also has a habit of looking rough after years of use, storage, or neglect. I’ve brought old pans back from orange rust and sticky buildup more than once, and the process is usually more forgiving than people think. If you want to know how to refurbish cast iron cookware the right way, this guide will walk you through each step with clear, practical advice.
What Refurbishing Cast Iron Cookware Really Means
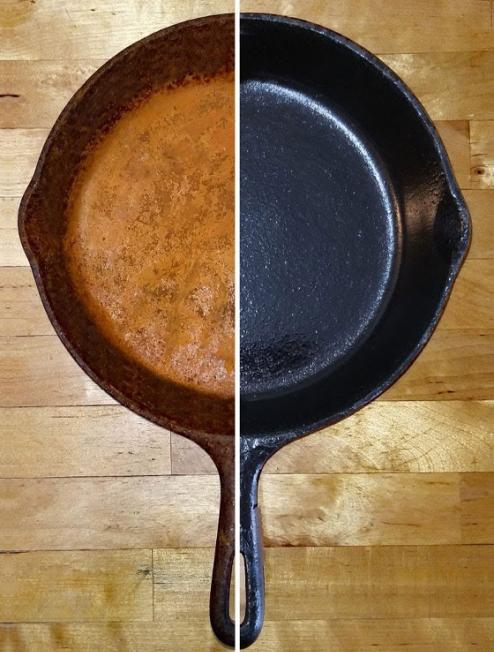
Refurbishing cast iron cookware means restoring it to a safe, usable, and well-seasoned condition. It usually involves removing rust, old seasoning, grime, and any damaged coating, then rebuilding that protective layer again.
In simple terms, you are giving the pan a reset. A cast iron skillet that looks sad and neglected can often become a workhorse again with a little patience and the right method.
People often confuse refurbishing with deep cleaning. Deep cleaning removes surface dirt, while refurbishing goes further by fixing the surface itself. That matters because cast iron depends on its seasoning, which is a thin layer of polymerized oil that helps prevent rust and improves cooking performance.
Signs Your Cast Iron Needs Refurbishing
You do not need to refurbish cast iron cookware every time it looks dull. Some pans just need a light wash and fresh seasoning. But there are clear signs that a full restoration is the better move.
Look for these clues:
- Orange or red rust spots
- Flaking black seasoning
- A sticky or gummy surface
- Strong burnt-on residue
- Uneven cooking from worn coating
- A musty smell from bad storage
- Food sticking badly even after normal seasoning care
If your pan has rust but the metal is still solid, that is usually fixable. If it has deep cracks or major warping, refurbishment may not be enough. In my experience, most older pans are far easier to save than people expect.

Tools and Supplies You Will Need
Before you begin, gather everything first. That makes the process smoother and helps you avoid rushing halfway through.
Here is a simple list:
- Dish soap
- Warm water
- Non-metal scrub brush or sponge
- Steel wool or a stiff scrub pad
- Baking soda
- White vinegar
- Paper towels or lint-free cloths
- Oven
- Cooking oil with a high smoke point, such as canola, vegetable, grapeseed, or flaxseed oil
- Aluminum foil or a baking sheet
- Oven mitts
A lot of people worry that soap will ruin cast iron. It used to be a bigger issue when soap was harsher, but mild dish soap is fine for removing grease during refurbishment. The key is to dry the pan fully and re-season it after cleaning.
Step-by-Step: How to Refurbish Cast Iron Cookware
Restoring cast iron is not hard, but it does reward patience. Think of it like repainting a wall after old paint has peeled away. The better the prep, the better the finish.
1. Remove loose dirt and old residue
Start by washing the pan with warm water and a small amount of dish soap. Use a scrub brush or sponge to loosen food bits, grease, and dust.
If you see thick buildup, sprinkle baking soda on the surface and scrub gently. This helps cut through grime without being too harsh.
2. Strip rust and damaged seasoning
If rust is present, scrub it with steel wool or a stiff pad until you reach bare metal in the affected areas. For heavy rust, a short soak in a 50/50 mix of white vinegar and water can help, but do not leave the pan in vinegar too long.
Here is the important part: check the pan often. Vinegar can eat into cast iron if you get careless, and I learned that the hard way on one old skillet that went from rusty to slightly pitted in a hurry.
3. Rinse and dry immediately
Once the surface is clean, rinse it well with warm water. Then dry it at once with a towel.
After towel drying, place the pan on low heat for a few minutes to drive out hidden moisture. This step matters because cast iron can flash rust fast, almost like it is punishing you for being slow.
4. Inspect the surface
Look at the metal closely. If you still see rust, repeat the scrubbing step. If the pan feels smooth and clean, you are ready for seasoning.
Some old pans will never look perfect, and that is okay. A little discoloration does not mean the cookware is ruined. What matters most is a clean, dry, protected surface.
5. Apply a thin coat of oil
Put a small amount of oil on the pan and wipe it over every surface, inside and out. Then wipe off as much as you can with a clean cloth or paper towel.
This is where many people go wrong. Too much oil creates a sticky finish instead of a hard seasoning layer. The coating should look almost dry, not greasy.
6. Bake the pan to build seasoning
Place the pan upside down in an oven preheated to about 450°F to 500°F. Put foil or a baking sheet on the lower rack to catch drips.
Bake it for about one hour, then turn off the oven and let the pan cool inside. This heat helps the oil bond to the metal and build that durable, nonstick surface cast iron is known for.
7. Repeat for a stronger finish
One coat of seasoning is helpful, but two to three rounds often give better results. This is especially true for rusty pans or cookware that was stripped fully.
If you want the best long-term result, repeat the oil-and-bake process several times. A well-seasoned pan usually gets darker, smoother, and more reliable with each cycle.
:max_bytes(150000):strip_icc()/__opt__aboutcom__coeus__resources__content_migration__serious_eats__seriouseats.com__images__2014__11__20141121-cast-iron-pan-restoration-daniel-gritzer-edit-27-468df3ad74404edabd52537bd0184aae.jpg)
How to Handle Different Levels of Damage
Not every pan needs the same treatment. The right method depends on how bad the damage is.
Light rust
For small rust spots, scrubbing with steel wool and re-seasoning is usually enough. You do not need to strip the entire pan unless the rust is widespread.
Heavy rust
For heavy rust, a vinegar soak or more aggressive scrubbing may be needed. After that, you should dry the pan fully and season it multiple times.
Sticky seasoning
Sticky seasoning usually means too much oil was used or the pan was not heated long enough. You can often fix this by heating the pan again, wiping off excess oil, and re-baking it.
Old baked-on food
Thick carbon buildup may need repeated scrubbing, baking soda, or a careful oven-cleaning method if the pan is extremely neglected. I usually avoid harsh shortcuts unless the pan is beyond normal cleanup, because cast iron is durable but still deserves restraint.
Best Oils for Re-Seasoning Cast Iron
The oil you use matters, but not as much as using it correctly. A thin, even layer is more important than chasing the “perfect” oil.
Good choices include:
- Canola oil
- Vegetable oil
- Grapeseed oil
- Sunflower oil
- Flaxseed oil
Each oil has tradeoffs. Flaxseed oil can form a hard coating, but it may also become brittle or flaky if applied too thickly. Neutral oils like canola and grapeseed are more forgiving, which is why many home cooks and cookware restorers prefer them.
Mistakes to Avoid When Refurbishing Cast Iron Cookware
I have made most of these mistakes myself, and they are common. The good news is that they are easy to avoid once you know what to look for.
Avoid these errors:
- Leaving the pan wet after washing
- Soaking cast iron for too long
- Using too much oil during seasoning
- Skipping the oven step
- Scrubbing too lightly when rust is present
- Storing the pan in a damp place
- Using harsh cleaners on a regular basis
- Giving up after one seasoning layer
A lot of bad results come from impatience, not bad technique. Cast iron is simple, but it rewards steady care.

How to Maintain Refurbished Cast Iron Cookware
Once your pan is restored, the goal is to keep it that way. Maintenance is much easier than full refurbishment.
Follow these habits:
- Wash soon after cooking
- Dry right away
- Heat briefly on the stove after drying
- Rub on a light coat of oil after each use if needed
- Store in a dry cabinet
- Avoid long water exposure
- Cook fatty foods sometimes to support seasoning
You do not need to baby the pan. You just need to keep water from sitting on it and avoid scraping off the seasoning unnecessarily. Over time, regular use often makes cast iron better, not worse.
Why Refurbishing Cast Iron Cookware Is Worth It
Refurbishing cast iron cookware has real benefits. It saves money, reduces waste, and brings old tools back to life. It also gives you a pan that can last for decades if you care for it well.
Here are the biggest advantages:
- Better cooking performance
- Less sticking
- Longer cookware life
- Lower replacement cost
- Less waste in landfills
- A pan that can often be passed down
There is also something satisfying about restoring a tool with your own hands. It feels a bit like rescuing a good story from the attic. You are not just cleaning metal; you are preserving a useful piece of kitchen history.
When to Replace Instead of Refurbish
Sometimes refurbishing is not the right answer. If the pan has a major crack, serious warping, or deep structural damage, it may not be safe to use.
You may want to replace the cookware if:
- The pan has a visible crack
- The base is badly warped
- The handle is broken beyond repair
- The damage affects safety or cooking stability
Surface rust is normal and fixable. Structural failure is different. When in doubt, choose safety over sentiment.
Frequently Asked Questions of How to Refurbish Cast Iron Cookware
How long does it take to refurbish cast iron cookware?
Most pans can be cleaned and first-seasoned in a few hours, including oven time. If the rust is heavy, you may need to repeat steps over one or two days.
Can I use vinegar to remove rust from cast iron?
Yes, a diluted vinegar soak can help remove rust, but it should be short. Leaving cast iron in vinegar too long can damage the surface, so check it often and rinse it right away.
Is black residue on cast iron normal after refurbishing?
A little black residue can be normal during the early seasoning stages. If it feels sticky or rubs off heavily, the pan may have too much oil and need another bake cycle.
How many times should I season cast iron after refurbishing?
Two to three seasoning cycles are a good starting point for most pans. Older or heavily stripped cookware may benefit from more rounds for a stronger finish.
Can I refurbish cast iron cookware in the dishwasher?
No, the dishwasher is too harsh for cast iron and can cause rust. Always wash by hand and dry it immediately to protect the seasoning.
What is the best way to store refurbished cast iron cookware?
Store it in a dry place with no trapped moisture. If you stack pans, place a paper towel inside to help absorb humidity and protect the seasoning.
Conclusion
Refurbishing cast iron cookware is one of those kitchen skills that pays you back again and again. Once you learn how to clean off rust, dry the pan fully, and rebuild the seasoning, even an old skillet can become a dependable daily tool.
The best part is that the process is not complicated. With a little care and patience, you can restore cast iron cookware, protect it for years, and enjoy better cooking along the way. If you have an old pan sitting in the garage or at the back of a cabinet, this is your sign to bring it back to life. Try the steps, trust the process, and share your results with someone who loves a good kitchen rescue story.