How to Clean an Old Cast Iron Skillet: Restore Shine Fast

How To Clean An Old Cast Iron Skillet
A well-loved cast iron skillet is a kitchen treasure. It can last for generations, handle high heat, and even improve with age. But when you find an old cast iron skillet covered in rust or sticky residue, you might wonder if it’s even possible to bring it back to life. The good news is: you can restore almost any cast iron skillet with the right cleaning, care, and patience. Whether you found it at a yard sale, inherited it, or just let yours sit a bit too long, this guide will help you transform that old skillet into a cooking hero.
I’ve rescued many tired pans over the years. Each one took effort, but each one rewarded me with a pan that cooks beautifully and holds memory. In this article I share step-by-step methods to clean cast iron, remove rust, and re-season a skillet so it becomes non-stick and safe. I’ll also share tools, safety tips, and what to do if things go wrong.
Why Clean And Restore Cast Iron?
Restoring an old skillet isn’t only about looks. Old, dirty, or rusty skillets can make food stick, taste strange, or even be unsafe. Proper cleaning removes harmful bacteria and old oils that can turn rancid. It also sets a good base for seasoning, the process that makes cast iron non-stick and durable.
With care, a cast iron skillet can last decades. Some families pass theirs down for over 100 years. Cleaning and seasoning make your skillet healthier, easier to cook with, and more valuable. Restoring cast-iron is also greener than buying new cookware. If you want to know how to clean an old cast iron skillet and restore its cooking surface, this guide gives practical, tested steps.
Understanding Cast Iron: What Makes It Special?
Cast iron is different from other pans. It’s made by pouring molten iron into a mold. This creates a strong, heavy pan with a textured surface. Unlike stainless steel or non-stick pans, cast iron relies on a polymerized oil layer—seasoning—for release and protection.
What Makes Old Cast Iron Unique?
- Retains heat better than most cookware
- Develops a natural non-stick surface with use (patina)
- Gets better with care and regular cooking
- Can be used on stove, oven, grill, or campfire
Cast iron needs special care. It can rust if left wet, and food sticks if it isn’t seasoned. Cleaning an old skillet means removing rust and old buildup, then protecting the surface for future use.
Assessing Your Old Skillet: What Are You Dealing With?
Before you start, take a close look. Each pan is different. The cleaning method depends on what you find.
Check for:
- Rust: Orange or brown spots, sometimes covering the whole pan.
- Baked-on residue: Black, sticky, or flaky bits from old food or burned oil.
- Sticky surface: Feels tacky, not smooth, even after washing.
- Pitting or cracks: Small holes or cracks in the metal. Cracked pans are not safe to use.
- Odor: Rancid or musty smell.
If the pan is only a little dirty, you may need simple cleaning. If it is covered in rust and gunk, you’ll need to strip it back and start fresh. Most skillets are salvageable unless they’re cracked or deeply pitted.
Essential Supplies For Cleaning And Restoring
To clean an old cast iron skillet, you’ll need a few basic tools and products. Some are found in most kitchens; others are worth buying if you plan to restore more pans.
Basic supplies:
- Steel wool (medium or coarse) — for rust and baked-on oil
- Stiff scrub brush or scrub sponge — for everyday scrubbing
- Dish soap (yes, it’s safe for deep cleaning) — removes oil and contaminants
- Coarse salt (like kosher salt) — gentle abrasive for scrubbing
- White vinegar — for breaking down rust
- Baking soda (optional) — neutralizes acid after vinegar soak
- Old towel or paper towels — for drying and oiling
- Vegetable oil, flaxseed oil, or shortening (for seasoning)
- Oven or stovetop — for drying and heat-seasoning
Optional but helpful:
- Plastic scraper — for removing stuck-on food
- Gloves — to protect skin when using harsh cleaners
- Safety glasses and mask — if using power tools or chemicals
- Oven cleaner — for heavy-duty paint-like gunk (use cautiously)
- Large container or sink — for vinegar soaks or soaking multiple pans
Recommended Amazon product:
For tough rust, the Lodge Chainmail Scrubber is a popular choice. It’s gentle on the skillet but tough on buildup. [Find it on Amazon by searching “Lodge Chainmail Scrubber”.]

Credit: www.youtube.com
Step-by-step: How To Clean An Old Cast Iron Skillet
Bringing back an old cast iron skillet isn’t hard, but it takes time and a bit of elbow grease. Below is a reliable method I use when I restore cast iron cookware. I’ve included alternatives for different levels of rust and residue.
1. Remove Rust And Old Seasoning
If the skillet is rusty or covered in black residue, you need to strip it back to bare metal. Choose a method based on how bad the buildup is.
Scrubbing By Hand
For light rust or minor residue:
- Rinse the skillet with warm water.
- Sprinkle coarse salt over the surface.
- Use a steel wool pad or stiff brush to scrub in circles. Press firmly, but don’t gouge the metal.
- Rinse and check. Repeat if needed.
For heavy rust:
- Use a coarse steel wool pad or an abrasive scrubber. Scrub until you see clean, silver metal.
- It can take 10–30 minutes or more for stubborn rust. Take breaks if your hands get tired.
The Vinegar Soak (for Heavy Rust)
If the rust is stubborn, a vinegar soak will help dissolve it. Vinegar is acetic acid and it eats rust. Used right, it’s very effective.
How to do it:
- Mix equal parts white vinegar and water in a large container.
- Submerge the skillet for 1–8 hours. Check every hour. Don’t leave it too long—vinegar can start to pit iron.
- When rust loosens, scrub with steel wool or the Lodge Chainmail Scrubber.
- Rinse thoroughly with warm water. If the pan smells acidic, sprinkle baking soda and rinse again to neutralize.
Oven Cleaner Method (for Thick Gunk)
If your skillet is covered in thick, black residue from old seasoning or carbonized oil, oven cleaner can strip it down. This is a strong chemical method and I only use it for extreme cases.
Steps:
- Spray the skillet with oven cleaner (wear gloves and do this outside or in a ventilated area).
- Place in a sealable plastic bag for 8–24 hours.
- Remove, scrub with steel wool, and rinse well.
- Wash with soap and water to remove residues.
Important: Oven cleaner is powerful. Rinse and wash the skillet thoroughly after using. Follow the product safety instructions.
2. Wash And Dry Thoroughly
After removing rust and gunk, wash the skillet with hot, soapy water. Yes, soap is fine at this stage. It removes leftover chemicals, vinegar, and old oil.
- Scrub all surfaces, including the handle and back.
- Rinse with hot water.
- Dry immediately with a towel. Any water left on the pan will cause rust.
3. Heat To Remove Moisture
To make sure your skillet is dry, place it on the stove over low heat for 5–10 minutes or put it in a warm oven for 10 minutes. This drives out hidden moisture from the metal. A dry skillet is less likely to rust and is ready for seasoning.
4. Seasoning: Building A Non-stick Surface
Now that your skillet is clean and bare, it needs new seasoning. Seasoning is a thin layer of oil polymerized into the iron. It protects from rust and makes the surface non-stick.
How to season:
- Pour a small amount of vegetable oil, shortening, or flaxseed oil into the pan (about 1 tablespoon).
- Use a paper towel to rub oil over the entire surface—inside, outside, and handle.
- Wipe away excess oil. The skillet should look almost dry, not greasy.
- Place the skillet upside down in a preheated oven at 450°F (230°C).
- Put a sheet of foil under the pan to catch drips.
- Bake for 1 hour. Turn off oven and let the skillet cool inside.
Repeat the oiling and baking 2–3 times for better build-up. More layers equal a stronger, smoother seasoning. I often do three thin coats for the best non-stick finish.
5. Maintenance After Restoration
Once restored, your skillet needs simple care to stay in great shape. A little attention after each use keeps the seasoning strong.
- Avoid soaking in water.
- Wash with hot water and a brush after each use.
- Dry immediately and apply a thin layer of oil.
- Store in a dry place.
If food sticks, sprinkle salt in the pan and scrub, then rinse and oil. These quick steps keep the patina healthy and your cooking consistent.
Comparing Cleaning Methods: What Works Best?
Each method for cleaning cast iron has its pros and cons. Here’s a quick comparison:
| Method | Best For | Time Needed | Skill Level | Risks |
|---|---|---|---|---|
| Steel Wool & Salt | Light/medium rust | 10–30 min | Beginner | Elbow grease needed |
| Vinegar Soak | Heavy rust | 1–8 hours | Beginner | Can damage iron if too long |
| Oven Cleaner | Thick residue | 12–24 hours | Intermediate | Harsh chemicals |
| Electrolysis | Severe rust, collectors | 24+ hours | Expert | Requires equipment, safety risk |
Most home cooks use steel wool and the vinegar method. Electrolysis is for serious collectors and requires special gear. Below I add a short explainer about electrolysis if you are curious.
Electrolysis: When And Why To Use It
Electrolysis uses a low-voltage electric current to remove heavy rust. It works well on collectible cast iron with severe corrosion. The process involves a battery charger, a sacrificial steel anode, and a baking soda solution. It removes rust without aggressive scrubbing.
I only recommend electrolysis if you are comfortable with basic electrical safety. It can be messy and takes time, but it preserves metal that would otherwise be lost to sanding or harsh chemical methods.

Credit: rgessford.wordpress.com
Common Mistakes To Avoid
Even experienced cooks can make mistakes with cast iron. Here are some to watch for:
- Letting the skillet stay wet: Always dry fully after washing. Even a few drops of water can cause new rust.
- Skipping seasoning: Bare cast iron will rust and food will stick. Always season after deep cleaning.
- Using harsh soaps daily: After restoration, avoid strong soaps for daily cleaning. They can strip seasoning.
- Leaving food in the pan overnight: Moist food can damage seasoning and cause rust.
- Using too much oil in seasoning: Thick oil pools can turn sticky. Wipe to a thin layer before baking.
- Ignoring cracks: Cracked pans are not safe. If you see a crack, don’t use the skillet for cooking.
- Storing with the lid on: This traps moisture and encourages rust. Store with the lid off or with paper towel inside.
- Using dishwasher: Never put cast iron in a dishwasher. The detergent and water will ruin seasoning.
Troubleshooting: If Problems Happen
Restoring old cast iron isn’t always perfect the first time. Here’s how to fix common issues.
Rust Returns
If you see new rust after cleaning, don’t panic. Scrub with steel wool, rinse, dry, and re-season. Small spots fix quickly. Prevent future rust by wiping with oil after each use and storing in a dry place.
Sticky Or Gummy Surface
If the skillet feels sticky after seasoning, you likely used too much oil or didn’t wipe excess. Scrub with hot water and salt, dry, and season again using less oil and thinner coats.
Flaking Or Peeling
If black flakes appear, old seasoning is coming off. Strip the pan back to bare metal and start over. Flaking means the bond between pan and seasoning failed—usually due to thick, uneven coats.
Uneven Color
After the first season, the pan may look brown, gray, or splotchy. This is normal. With more use and seasoning, the surface will darken and even out. Regular cooking—especially frying with oil—builds a rich patina over time.
How To Store And Use Your Restored Skillet
A restored cast iron skillet needs the right care to stay in great shape. Here’s how to keep it ready for any meal.
- Store in a dry place: Avoid areas with moisture, like under the sink.
- Keep a thin layer of oil: After each use, wipe with a little oil to protect the surface.
- Use often: Cooking with your skillet builds seasoning. Frying bacon or potatoes is great for building a shiny, black surface.
- Avoid acidic foods at first: Tomatoes or vinegar-based sauces can strip new seasoning. Once the pan is well-seasoned (after 5–10 uses), it’s safe to use for anything.
- Stack with care: If stacking pans, place a paper towel between them to prevent scratches.
Data Table: Before And After Restoration
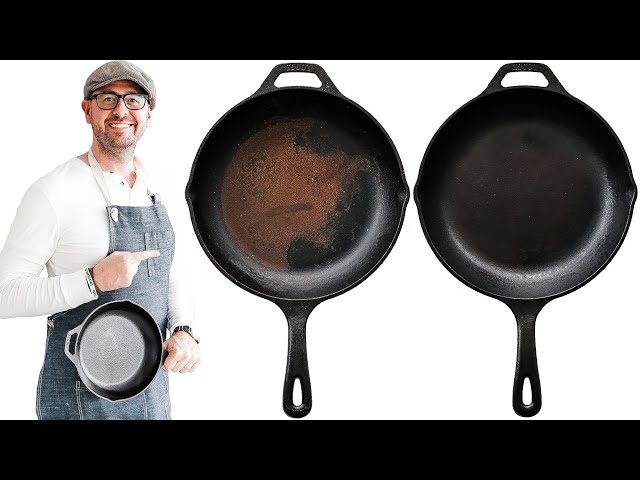
To see what a difference cleaning makes, here’s how a restored skillet compares to an old, rusty one:
| Feature | Old, Rusty Skillet | Restored Skillet |
|---|---|---|
| Color | Orange-brown, dull | Black, shiny |
| Surface | Rough, flaky, sticky | Smooth, non-stick |
| Smell | Musty, rancid | Clean, neutral |
| Cooking Results | Sticking, uneven heating | Easy release, even browning |
| Value | Low, often discarded | High, can last decades |
Non-obvious Insights For Beginners
Many guides miss a few key tips that make restoration easier. I learned these from practice and from talking to restorers and vintage-cookware collectors.
- Use flaxseed oil for seasoning: While vegetable oil works, food-grade flaxseed oil creates a harder, shinier surface. It’s pricier but gives a professional finish.
- Preheat before oiling: Warming the pan on the stove for a minute helps the oil spread evenly and soak in better.
- Salt and potato trick: For stubborn spots, cut a potato in half, dip it in salt, and scrub. The mild acid and abrasion lift residue without damaging the iron.
- Repeat cleaning if needed: Sometimes the first pass doesn’t remove all rust or gunk. It’s okay to repeat the process until you reach bare metal.
- Patina develops with use: The non-stick surface gets better as you cook fatty foods. Regular cooking is the best way to build a great finish—don’t rush it.
How Often Should You Clean And Reseason?
Deep cleaning and full reseasoning are only needed if the pan is rusty or sticky. For regular use:
- Wash after each use with water and a brush.
- Dry and wipe with a bit of oil.
- Reseason in the oven every few months or if the pan looks dull.
If you cook often, the seasoning becomes more durable with time. For best long-term care, I give my most-used pans a quick oven re-season once or twice a year.
Credit: www.youtube.com
When To Buy A New Skillet
Most old cast iron skillets can be saved. But there are times when it’s better to buy a new one:
- The pan is cracked or has a hole.
- The bottom is warped and won’t sit flat.
- Deep pitting covers the cooking surface.
If you need a reliable new skillet, the Lodge Pre-Seasoned Cast Iron Skillet is a top choice. It’s affordable, comes pre-seasoned, and is available on Amazon.
Real-life Example: Restoring A Family Heirloom
Imagine finding your grandmother’s cast iron skillet in the basement, covered in rust after years of storage. At first glance, it looks ruined. But after a vinegar soak, some scrubbing with steel wool, and three rounds of oven seasoning, the skillet looks almost new.
Not only does it cook better than many modern pans, but you’re also cooking with a piece of family history. Many people say food cooked in an old, well-seasoned skillet just tastes better. Restoring a cast iron pan is more than cleaning metal—it’s bringing back memories and making new ones.
Safety Precautions When Restoring Cast Iron
Restoring cast iron is mostly safe, but take common-sense precautions:
- Work in a well-ventilated area if you use oven cleaner or chemicals.
- Wear gloves to protect your skin from acid, cleaners, or sharp edges.
- Use eye protection if you’re scrubbing hard or using power tools.
- Handle hot pans carefully when testing seasoning in the oven or on the stove.
- If you attempt electrolysis, follow strict electrical safety rules and keep children and pets away.
Additional Resources
For more details on cast iron care, you can visit the official Lodge Cast Iron Care Instructions. Their advice is trusted by home cooks and professionals. For community tips and restoration stories, look for vintage cast-iron forums and restoration videos—many enthusiasts share before-and-after photos and recipes.
Frequently Asked Questions
How Do I Know If My Old Cast Iron Skillet Is Safe To Use?
Check for cracks or deep pitting. If the skillet is cracked, it’s not safe for cooking because it could break further with heat. Light rust and residue can be cleaned. Major structural damage means it’s time to replace the pan.
Can I Use Soap To Clean Cast Iron?
Yes, you can use mild dish soap for deep cleaning, especially when restoring an old skillet. After seasoning, avoid strong soaps for daily cleaning to protect the non-stick surface.
How Do I Prevent Rust After Cleaning?
Always dry the skillet completely after washing and wipe with a thin layer of oil. Store in a dry place and avoid leaving food or water in the pan. If you live in a humid area, put a paper towel inside the pan to absorb moisture.
What Oil Is Best For Seasoning?
Vegetable oil is common and works well. Flaxseed oil creates a harder, more durable seasoning but must be used carefully. Avoid using animal fats as the primary seasoning oil because they can turn rancid if not used often.
Can I Restore A Skillet With Deep Rust Or Black Residue?
Yes, most skillets can be restored with a vinegar soak, scrubbing, and seasoning. Only skillets with deep pits, holes, or structural cracks are not worth saving. If you are unsure, a thorough inspection after stripping the rust will show whether the metal is sound.
Cleaning an old cast iron skillet may take time, but the results are worth it. With proper care, your skillet can deliver great meals for years to come. Whether you’re rescuing a family heirloom or giving a new life to a flea market find, restoring cast iron is a satisfying project for any home cook.
Quick Restoration Checklist (At-a-Glance)
- Inspect pan for cracks or heavy pitting — if present, consider replacing.
- Remove loose rust and debris with a brush or scraper.
- Use steel wool & salt for light rust. Vinegar soak for heavy rust.
- Rinse thoroughly, neutralize acid with baking soda if used, and wash with soap.
- Dry completely with towel and heat on stove or oven.
- Apply a thin coat of oil and bake at 450°F (230°C) upside down for 1 hour. Repeat 2–3x.
- Store dry, and wipe with oil after each use.