How To Refinish Cast Iron Cookware: Easy Steps For 2026

You can refinish cast iron cookware by stripping rust, cleaning deeply, and reseasoning it with oil.
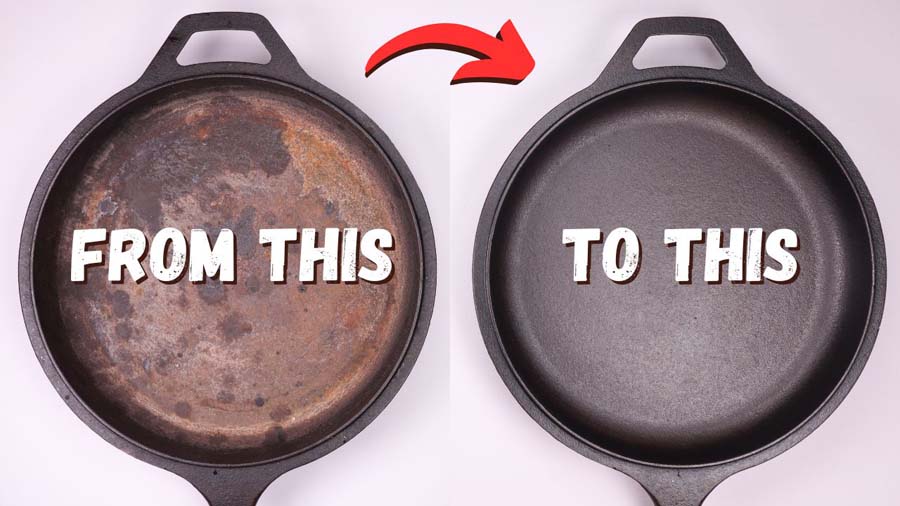
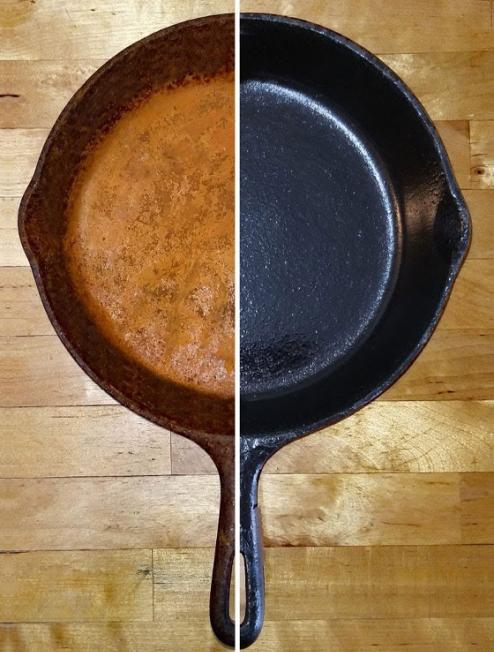
Cast iron has a second life if you treat it right. I’ve brought old skillets back from orange, flaky, “maybe this is trash” condition to smooth, dark, and ready for years of cooking. If you want to learn how to refinish cast iron cookware the right way, this guide walks you through every step with practical tips, common mistakes, and real-world advice that can save a skillet.
What Refinsihing Cast Iron Cookware Really Means
Refinishing cast iron cookware means restoring the bare metal, fixing rust or buildup, and rebuilding the seasoning layer. It is different from just washing a pan or doing a quick reseason. You are giving the cookware a clean start so it can perform well again.
Most people need to refinish cast iron cookware when the surface feels rough, the seasoning is patchy, or rust keeps coming back. Sometimes the pan has been left in a sink too long. Sometimes it was stored in a damp place. And sometimes it was cleaned with the wrong soap or scrubber and lost its protective layer.
The good news is that cast iron is tough. If the pan is not cracked or warped, there is usually a way to fix it. I have seen pans that looked beyond hope come back strong with patience and a simple process.
Signs Your Cast Iron Needs Refinishing
A lot of people try to cook on a pan that really needs repair. That usually leads to sticky food, off flavors, and more rust. The earlier you spot the problem, the easier the fix.
Look for these signs:
- Rust spots that return after washing
- A dull gray surface instead of a dark, smooth one
- Flaking seasoning that comes off in chips
- Food sticking more than usual
- A rough, uneven texture
- A musty smell from poor storage
- Pitting or deep rust marks
One thing I learned early on is that not every ugly skillet needs a full strip-down. Some pans only need a deep clean and a few seasoning rounds. But if rust is spreading or the seasoning is failing everywhere, it is time to refinish cast iron cookware from the ground up.
Tools and Supplies You Need
You do not need a fancy shop to refinish cast iron cookware. Most of the tools are simple and easy to find. Having everything ready before you start makes the process smoother and less messy.
Gather these supplies:
- Dish soap
- Warm water
- Stiff brush or scrub pad
- Steel wool or a chainmail scrubber
- Paper towels or lint-free cloths
- White vinegar
- Baking soda
- Oven
- High-smoke-point oil such as flaxseed oil, grapeseed oil, canola oil, or vegetable oil
- Aluminum foil or a baking sheet
- Oven mitts
- Gloves if you want to protect your hands
You may also want a plastic tub or sink large enough to soak the pan. If the rust is heavy, vinegar and water can help loosen it. Just do not leave the pan in vinegar too long, because acid can start damaging the metal.
Step-by-Step: How to Refinish Cast Iron Cookware
Refinishing cast iron is a process of patience, not force. The goal is to remove rust and weak seasoning, then rebuild a thin, even layer of polymerized oil. Think of it like laying down new floorboards instead of patching a crumbling path.
1. Clean off grease and loose debris
Start with warm water and dish soap. Scrub away old grease, food bits, and soft residue. This first wash helps you see the real condition of the pan.
If the surface is sticky or gummy, scrub harder until it feels clean. A pan cannot be properly refinished if oil and grime are still coating it. Clean metal and clean trouble spots make the next steps work better.
2. Remove rust and old seasoning
Use steel wool, a stiff scrub pad, or a chainmail scrubber to remove rust and flaking seasoning. Work in circles and keep going until the loose material is gone. If needed, use a little vinegar solution on rust patches.
For heavy rust, mix equal parts white vinegar and water, then soak the rusty area for a short time. Check often. I usually start with 15 to 30 minutes, then scrub and reassess. Leaving cast iron too long in vinegar can pit the surface.
If the pan has thick, baked-on residue, a stronger strip may help. Some people use a lye-based cleaner or self-cleaning oven method, but those methods need care. Always follow safety steps and never mix chemicals.
3. Wash, rinse, and dry fully
Once the rust and buildup are gone, wash the pan again with soap and water. Rinse well so no loose debris or vinegar remains. Then dry it right away.
Drying matters more than many beginners think. Cast iron can flash-rust fast, sometimes in minutes. I like to towel-dry first, then place the pan on a warm burner or in a low oven for a few minutes to make sure every bit of moisture is gone.
4. Inspect the surface
Before seasoning, check the pan for rough spots, deep pits, or remaining rust. A few tiny pits are normal and usually not a problem. Large cracks, serious warping, or broken handles are different issues and may make the cookware unsafe.
If the surface still feels flaky or rough, scrub again. The smoother you get the base layer, the better the final seasoning will hold. This step is where patience pays off.
5. Apply a very thin layer of oil
Use a small amount of oil and wipe it over the entire pan, inside and out. Then wipe off almost all of it with a clean cloth or paper towel. The pan should look barely oiled, not greasy.
This part is crucial. Too much oil is one of the most common mistakes when people refinish cast iron cookware. Thick oil forms sticky spots instead of a hard seasoning layer. A thin coat turns into a stronger, more even finish.
6. Bake the pan to build seasoning
Place the pan upside down in a preheated oven. Put foil or a baking sheet below it to catch drips. Bake it at around 450°F to 500°F, depending on the oil you use.
Bake for one hour, then let it cool in the oven. Repeat this process several times for a stronger finish. Three to five rounds is a solid target if the pan was badly damaged.
Seasoning works because heat changes the oil into a hard, protective coating. That coating helps food release more easily and protects the iron from moisture. It is the foundation of well-refinished cast iron cookware.
7. Repeat as needed
Do not expect one round to fix everything. A restored pan often looks better after each bake. By the third or fourth layer, the surface usually becomes darker, smoother, and more reliable.
I have had pans that felt disappointing after the first round but turned out great after a few cycles. This is normal. Cast iron rewards consistency, not speed.
:max_bytes(150000):strip_icc()/__opt__aboutcom__coeus__resources__content_migration__serious_eats__seriouseats.com__images__2014__11__20141121-cast-iron-pan-restoration-daniel-gritzer-edit-9-f23a39c0040e416e97ae6b7e68b21d41.jpg)
Best Oils for Refinishing Cast Iron Cookware
Not all oils behave the same way. Some build seasoning well, while others can turn sticky or uneven. The best choice is usually a neutral oil with a high smoke point and a history of working well in cast iron care.
Good options include:
- Grapeseed oil
- Canola oil
- Vegetable oil
- Avocado oil
- Flaxseed oil, with caution because it can be brittle if applied too thickly
If you ask seasoned cast iron fans, you will hear different opinions. In my experience, the best oil is the one you can apply in a thin layer and bake cleanly without residue. The method matters more than chasing a perfect “magic” oil.
Common Mistakes to Avoid
Refinishing cast iron cookware is simple, but it is easy to make a few costly mistakes. I have made several of these myself, and each one taught me something useful.
Avoid these errors:
- Leaving the pan wet after washing
- Soaking too long in vinegar
- Using too much oil during seasoning
- Skipping rust removal before baking
- Baking at a low temperature that does not fully cure the oil
- Storing the pan in a damp cabinet
- Using harsh detergents every time without rebuilding seasoning when needed
The biggest mistake is usually impatience. People want an instant fix, but cast iron often needs a few cycles to settle in. When you take your time, the results last much longer.
How to Restore Different Levels of Damage
Not every pan needs the same treatment. A light cleanup is very different from rescuing a rusted flea market find. Matching the method to the damage level makes the job easier and safer.
Light rust and weak seasoning
If the damage is minor, scrub the pan, dry it well, and apply a few seasoning coats. This is usually enough for cookware that has been neglected but not seriously damaged. You may only need one afternoon to bring it back.
Moderate rust and flaky surface
For moderate damage, use vinegar or steel wool to remove rust first. Then wash, dry, and bake on multiple thin layers of oil. This is the most common kind of cast iron restoration project.
Heavy rust and old neglect
When the pan has deep rust, thick buildup, or years of storage damage, start with a full strip and careful inspection. Some people use lye, oven cleaner, or electrolysis for severe cases. These methods can work, but they require extra caution and good ventilation.
How Long It Takes to Refinish Cast Iron Cookware
The timeline depends on the condition of the pan. A lightly rusted skillet may be ready in a few hours. A badly neglected pan can take a full day or more, especially if you do several seasoning rounds.
Here is a simple way to think about it:
- Light restoration: 2 to 4 hours
- Moderate restoration: 4 to 8 hours
- Heavy restoration: 1 day or more
The waiting time is mostly hands-off. The oven does the work during seasoning, while you just make sure the layers are thin and even. That is one reason cast iron care is so satisfying. It asks for effort, but not constant attention.
How to Keep the Refinished Surface in Good Shape
Once you refinish cast iron cookware, the real win is keeping it that way. Good maintenance prevents rust and reduces the need for deep restoration later.
Try these habits:
- Dry the pan completely after washing
- Rub on a tiny amount of oil after use if the pan looks dry
- Store it in a dry place
- Avoid long soaks in water
- Heat the pan gently before cooking
- Use it often, because regular cooking helps strengthen seasoning
- Clean stuck food with a scraper or brush instead of soaking too long
I often tell people that cast iron likes a routine. The more consistently you use and care for it, the better it behaves. It is a little like a cast iron pan has memory. It remembers how you treat it.
Benefits of Refinishing Cast Iron Cookware
There is a reason people keep restoring old cast iron instead of replacing it. A good pan can last for generations, and refinishing helps you get back the value that is already there.
Main benefits include:
- Restores nonstick-like performance
- Removes rust and buildup
- Extends the life of the cookware
- Saves money compared with buying new pans
- Keeps vintage or heirloom pieces in use
- Improves cooking results and heat retention
This is also one of the most sustainable kitchen projects you can do. Instead of throwing away a tough piece of metal, you bring it back to life. That feels good, and it usually cooks better than many modern nonstick pans once the seasoning is solid.
When Not to Refinish Cast Iron Cookware Yourself
There are times when DIY restoration is not the best path. If the pan is cracked, badly warped, or unsafe to handle, it may need replacement. Deep structural damage is a different issue from surface rust.
Be careful if:
- The skillet has a visible crack
- The handle is broken or unstable
- The metal is badly warped
- The cookware has a questionable coating that you cannot identify
- The rust is so advanced that the surface is thin and unstable
Trust the pan, but also trust your judgment. Some cookware can be saved. Some should be retired. That is part of being a careful cook.
Frequently Asked Questions of How to Refinish Cast Iron Cookware
How do you remove rust from cast iron cookware?
Use steel wool, a stiff scrubber, or a vinegar solution to loosen the rust. Scrub until the orange or brown spots are gone, then wash, dry, and reseason the pan.
Can you refinish cast iron cookware in the oven?
Yes, the oven is one of the best ways to rebuild seasoning. Apply a very thin layer of oil, place the pan upside down, and bake it at high heat for about an hour.
What oil is best for refinishing cast iron cookware?
Canola, grapeseed, vegetable, and avocado oil are all common choices. The best oil is one that you can apply in a very thin layer and bake cleanly without leaving sticky residue.
How many seasoning layers do I need?
Most pans do well with three to five rounds, especially after rust removal. A lightly damaged pan may need fewer layers, while a heavily restored one may need more.
Is it safe to use vinegar on cast iron?
Yes, but only for short periods. A quick vinegar soak can help remove rust, but leaving cast iron in vinegar too long can damage the metal surface.
Why does my cast iron feel sticky after seasoning?
Sticky seasoning usually means too much oil was used or the oven temperature was too low. Wipe off excess oil and bake again with a thinner coat.
Conclusion
Refinishing cast iron cookware is one of those kitchen skills that pays you back for years. Once you know how to remove rust, clean the surface well, and rebuild seasoning with thin oil layers, an old pan can become one of your most reliable tools again.
The key is simple: go slowly, keep the layers thin, and stay consistent. If you have a skillet that looks rough right now, do not give up on it. Start the restoration process, learn from the pan, and enjoy the satisfaction of turning something tired into something useful again. If this guide helped, explore more cast iron care tips, share your own restoration story, or leave a comment with your toughest pan rescue.